


Frequently Asked Questions
-
How to disable your extension?
-
To disable any of our extensions, please, follow this algorithm:
1. Edit app/etc/modules/Neklo_XXX.xml file (where XXX stands for the extension name/code).
2. Change "true" to "false".
3. Clear the cache.
As soon as you have done it the extension is disabled completely, meaning it no longer affects any Magento functionality.
-
How to install a Magento extension by NEKLO?
-
1. 1. Disable Compilation mode if it is enabled (System - Tools - Compilation).
2. Unpack the archive purchased from our Magento Store and copy the contents of the ‘extension’ folder to the root folder of your Magento installation.
3. Log out from Magento Admin panel if you are logged in and then log back.
4. Clear the cache. If Cache Control is enabled in Magento go to ‘System > Cache Management’ section, select ‘Refresh’ under ‘All Cache’ drop-down menu and press ‘Save Cache Settings’.
5. Go to ‘System > Configuration > NEKLO tab > Extensions & Contact’ section and check the list of extensions installed for the name of your purchased extension. If it is in the list the installation is complete.
-
How to translate an extension?
-
There are two options for translating your Magento extension.
1. Please open app/locale/en_US/ Neklo_XXX.csv, copy it to your locale folder, for example to app/locale/de_DE/ Neklo_XXX.csv and change the wording after the "," so the line will look like "Product review","Testbericht".
2. If there are the necessary language packs installed, you can use inline translation. To do that, please, go to admin/system/configuration/ developer, choose the storeview you want to translate and enable inline translation for it. Then go to the front end, select text and translate.
-
How to uninstall the extension?
-
To completely uninstall any of our extensions, first start from disabling it. To disable the extension, please follow the next steps:
1. Edit … file (where XXX stands for the extension name/code).
2. Change "true" to "false".
3. Clear the cache.
At this point the extension is completely disabled and is not visible for Magento.
Now you can safely remove the extension files, although it is not necessary.
-
How to update NEKLO extension?
-
1. Log in into your account
2. Download the extension (it will be always the latest extension version)
3. Unpack the downloaded folders
4. Disable the Compilation mode in Magento
5. Upload the overwriting existent files of our extensions to Magento root folder (please note that if you customized the files of our extension, the customizations will be overwritten)
6. Refresh site cache (if it's enabled)
7. Re - run the Compilation mode
-
I’m getting this error: SQLSTATE[23000]: Integrity constraint violation. What shall I do?
-
Next time, please, disable the compilation mode prior to uploading the extension files to your server.
And now, please, follow these steps:
1. Open app/etc/local.xml
2. Replace
<disable_local_modules>false</disable_local_modules> with
<disable_local_modules>true</disable_local_modules>
3. Log in to admin panel and disable the compilation.
4. Revert the changes in the local.xml
5. Clear the cache.
-
I’m running several stores, shall I buy a separate extension for each of them or it is possible to use one extension?
-
You can use one extension per one live Magento installation. It means that if you run multiple stores on same one Magento installation, you just buy our extension once and then use it for all your stores.
In case your stores run on separate live Magento installations, you need to buy an extension for each of them.
-
There’s a "404 Not Found" error when opening configuration page.
-
Please, log out and then log back into the backend, so Magento can refresh permissions.
Features of Share Buttons for Magento 1
What Share Buttons Extension does
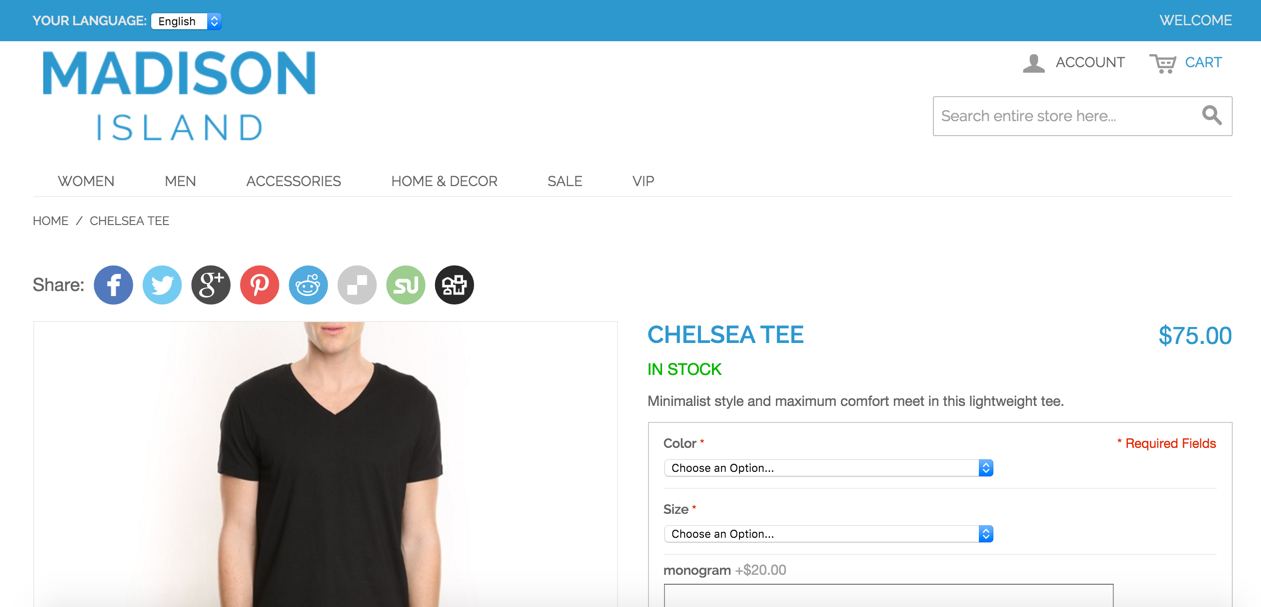
The widget you set adds share buttons dealing with widely used social webs. It grants your users a possibility to publish a link to your store page on their personal accounts. Share Buttons permits you smooth integration with the portals that are extremely popular among of all age, so it appears to be simpler for you to reach your desired target audience. Apart from it, Share Buttons has the following features.
Use Social Media properly
Choose a social network for your integration
Share Buttons extension for Magento 1 permits a store owner to have integration with a many social network services at once. The main feature here is that one is able to decide which of them are appropriate and which appear to be pointless to the store and customers. Choose as many social media sources for integration as you wish and freely add them to your website.
Choose an exact place
Set the exact location of the widget
The extension supports easy customization, so it is possible to attach a widget to any place of any page. You can choose any page you wish, like Configurable Product or Downloadable Product page, and then assign a specific Block Reference, like Page Footer or Main Content Area. Thus you are free to customize the widget the way it will be suitable for your existing design.
Install and configure the extension with little efforts
Easy installation process
Share Buttons installation procedure doesn’t take much time. The most important thing you should have is FTP/SSH access details. Another thing to remember well in advance is that you should disable code compilation well prior to the overall process of installation. Otherwise, your website may become unavailable during Share Buttons installation. The first thing you should do is downloading a zip folder with Share Buttons. Then unpack it and paste the extracted files from it to your root folder. The only thing left is flushing your cache. That is all, your extension is ready to work. Don’t forget though to switch on the code compilation.
Simple and understandable settings
Share Buttons provides only those settings that are necessary for the proper work of the extension. You won’t get lost among endless graphs with useless options responsible for minor and undistinguished features that no one will exploit. Share Buttons extension has only valid settings that are easy to use and perform clearly visible changes on frontend. Nothing in excess.
Configure its visual appearance
Show and hide a particular widget easily
Among others, Share Buttons has an option allowing for easy switching a widget on and off. So, without completely disabling the whole extension, you can temporary hide one widget without deleting it. This option is extremely useful, when you need to test anything or perform changes in design and want to check it.
Make widgets match the website design
The extension has a number of options responsible for visual changes on frontend. For example, you can set the shape of the icons of social media websites. Or you can make these icons be colorful or simple black-and-white depending on your website gamma.
Starting to work with Share Buttons
Adding your Share Buttons widget
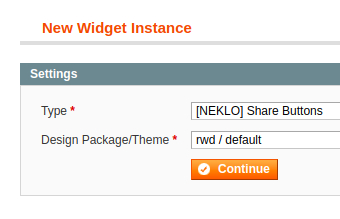
To add your first Share Buttons widget, go to CMS > Widgets > Add New Widget Instance. Immediately after you will find yourself on the widget adding section. To proceed further, choose “[NEKLO] Share Buttons” in the graph “Type” and then the desired theme. As a result you will create a widget that is still in need of further customization.
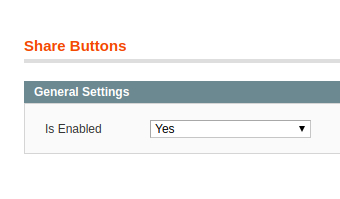
Switch Share Buttons on
First and foremost, you have to switch the installed extension on. To do so, go to System > Configuration > NEKLO > Share Buttons. There you will come across the graph “Is Enabled”. Set to “Yes” to turn it on. Switching to “No” will disable all the existing widgets and the extension in general.
Adding your Share Buttons widget
To add your first Share Buttons widget, go to CMS > Widgets > Add New Widget Instance. Immediately after you will find yourself on the widget adding section. To proceed further, choose “[NEKLO] Share Buttons” in the graph “Type” and then the desired theme. As a result you will create a widget that is still in need of further customization.
Find main configurations
Setting the exact place for your widget
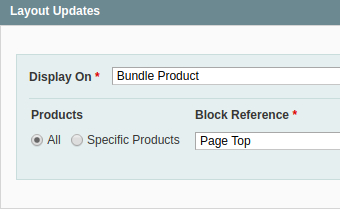
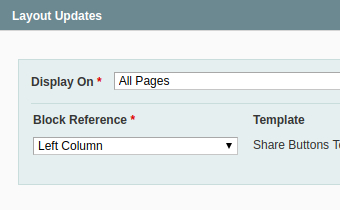
The last option in this tab is Layout Updates. Here you are able to set the exact page and a place on it, where your widget will be displayed. Press the button “Add Layout Updates” and proceed to the further settings. “Display On” allows you to pick a page for this particular widget. You may choose, for example, Configurable Product Page and then see your widget there. You can also display it on all the pages of your store - it is you who decides.
Further, choose whether you are interested in widget showing
for all your products/categories or only for specific products,
which you set. The last feature here is Block Reference - it
regulates the particular place on a page where the widget will be
shown.
Proceeding with the widget adjusting
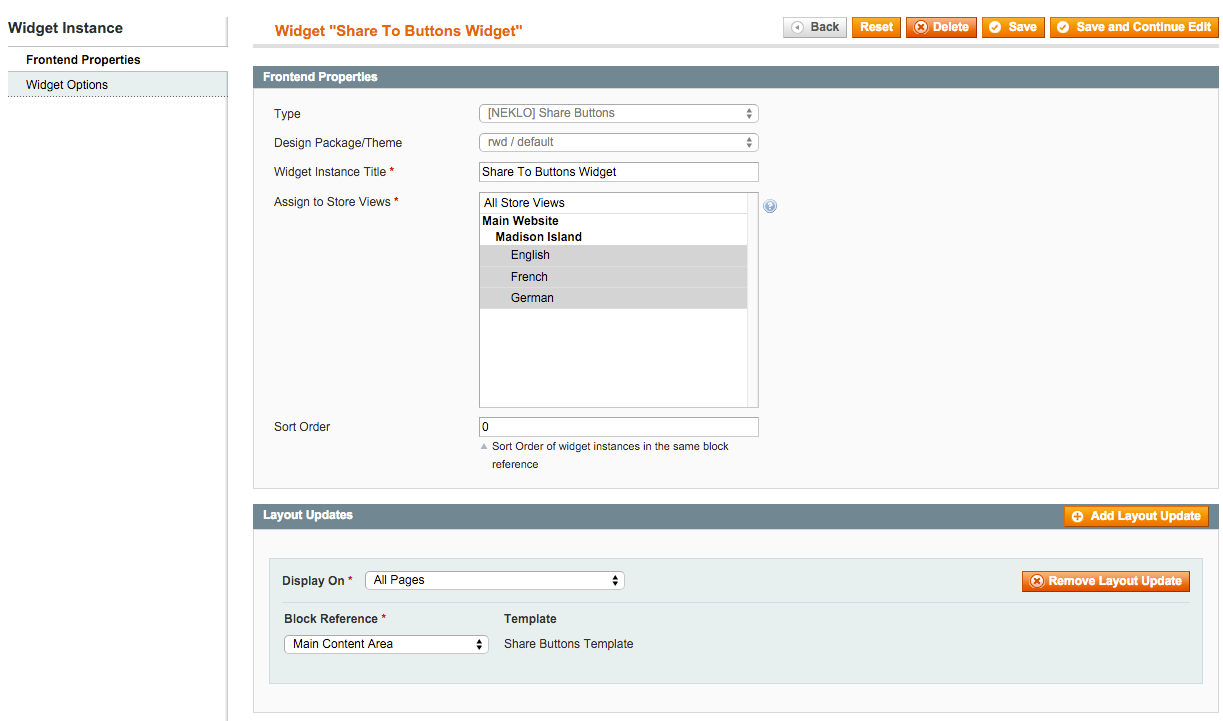
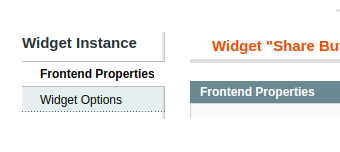
Right after you have created your first widget, you will find a number of appeared settings. On the left you will see two new sections: Frontend Properties and Widget Options. Firstly you will find yourself in the Frontend Properties tab. Here are the most important settings for the right widget performance located.
Managing with basic settings of Share Buttons
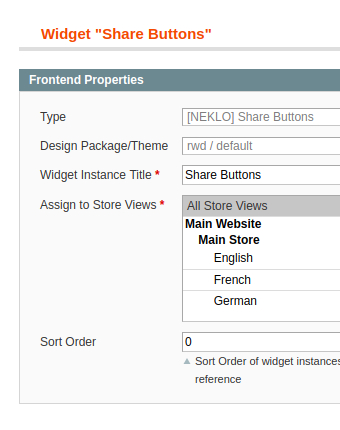
In this tab you can give a name to your widget. In the graph “Widget Instance Title” set an appropriate title for your widget to make it well recognizable among your other widgets. You may set any title you find convenient. The next option here is “Assign to Store Views”. It is responsible for widget displays on various store views if you have a number of them, for example, for different languages. Of course, you can set a widget to all your store views with a single click. Then choose the numerical order of this widget in the main list of widgets in “Sort Order”.
Setting the exact place for your widget
The last option in this tab is Layout Updates. Here you are able to set the exact page and a place on it, where your widget will be displayed. Press the button “Add Layout Updates” and proceed to the further settings. “Display On” allows you to pick a page for this particular widget. You may choose, for example, Configurable Product Page and then see your widget there. You can also display it on all the pages of your store - it is you who decides. Further, choose whether you are interested in widget showing for all your products/categories or only for specific products, which you set. The last feature here is Block Reference - it regulates the particular place on a page where the widget will be shown.
Proceed with adjusting
Dealing with additional features of the extension
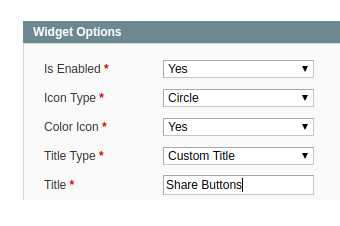
The next tab here is called “Widget Options” and it contains settings responsible mosty for visual appearance of the widget. Here you can set such features as the shape and color of displaying icons and actually the social media resources to integrate the extension with.
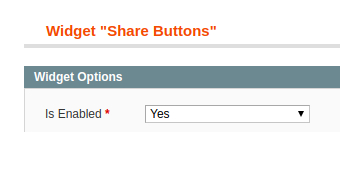
Dealing with widget display on your website
The first option here is “Is Enabled”. It regulates the appearance of the particular widget you are editing right now. With the help of it you can hide one specific widget without disabling the extension in general.
Set its appearance
Customizing your Share Buttons widget
The next three settings deal here exclusively with design and visual appearance of Share Buttons widget. The option “Icon Type ” allows to set the desired way how the share icons will appear in the store. Choose between social networks’ symbols on a circle background, on a square one, or choose a simple display with no background at all.
Then you can proceed with the icons design settings. The option “Color Icon” is responsible for setting the color palette of the existing symbols. If “Yes”, the icons will be presented in the original colors of the correspondent website. If “No” - the style will preserve its conservative colors and will be black-and- white. Just choose here the palette that will suit your website design. In combination with shape settings, you can make the widget look the way you want to see it.
Giving your widget a name
If you proceed with the settings, you will see the “Title Type” graph. It is responsible for choosing the exact name of your widget. If set “Page Title”, then the widget will automatically take the title of the assigned page for the published post in a social network. If you choose “Custom Title”, you will have to input a specific name for your widget. In general, this graph sets the title your users will see upon reposting your pages in their social media accounts.
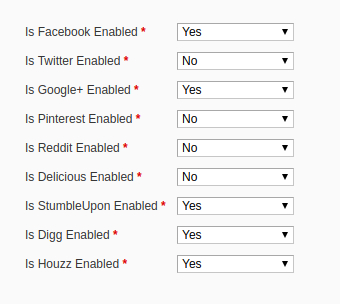
Manage Social Media communication
- Twitter (if enabling it, you will also have to add your Twitter Username and hashtags separated by commas)
- Google+
- Delicious (if enabling, you should also set the company that shares the url)
- StubleUpon
- Digg
Set the social networks you want to display
Share Buttons extension supports a number of social media to work with. You are free to choose which websites may be popular among your clients. The list of available networks is quite large, so you are free to choose a number of them or just a single one. Check this list of the provided websites.
Installing Share Buttons
To install NEKLO extension for Magento 1, you need to have FTP/SSH access details. Take notice that It is necessary to disable code compilation before installing the extension. If this setting is left enabled, the extension installation can make your website inaccessible.
To disable code compilation, login in your Admin panel and go to System > Tools > Compilation and click “Disable” there.
Then the main process of installation starts. To Install the extension you should:
1. Download a zip folder with this extension
2. Extract all the files from it and upload them to
the root folder with your Magento 1 installation.
3. Flush your cache. To do so, log in your Admin Panel
and go to System > Cache Management.
4. Don’t forget to enable code compilation proceeding
to System > Tools > Compilation after the successful installation
of Share Buttons.
5. The last step is logging out from your Magento admin
panel and then login again to reload ACL (account control level) rules.
Frequently Asked Questions
2. Unpack the archive purchased from our Magento Store and copy the contents of the ‘extension’ folder to the root folder of your Magento installation.
3. Log out from Magento Admin panel if you are logged in and then log back.
4. Clear the cache. If Cache Control is enabled in Magento go to ‘System > Cache Management’ section, select ‘Refresh’ under ‘All Cache’ drop-down menu and press ‘Save Cache Settings’.
5. Go to ‘System > Configuration > NEKLO tab > Extensions & Contact’ section and check the list of extensions installed for the name of your purchased extension. If it is in the list the installation is complete.
In case your stores run on separate live Magento installations, you need to buy an extension for each of them.
And now, please, follow these steps:
1. Open app/etc/local.xml
2. Replace
<disable_local_modules>false</disable_local_modules> with
<disable_local_modules>true</disable_local_modules>
3. Log in to admin panel and disable the compilation.
4. Revert the changes in the local.xml
5. Clear the cache.
1. Edit … file (where XXX stands for the extension name/code).
2. Change "true" to "false".
3. Clear the cache.
At this point the extension is completely disabled and is not visible for Magento.
Now you can safely remove the extension files, although it is not necessary.
1. Edit app/etc/modules/Neklo_XXX.xml file (where XXX stands for the extension name/code).
2. Change "true" to "false".
3. Clear the cache.
As soon as you have done it the extension is disabled completely, meaning it no longer affects any Magento functionality.
1. Please open app/locale/en_US/ Neklo_XXX.csv, copy it to your locale folder, for example to app/locale/de_DE/ Neklo_XXX.csv and change the wording after the "," so the line will look like "Product review","Testbericht".
2. If there are the necessary language packs installed, you can use inline translation. To do that, please, go to admin/system/configuration/ developer, choose the storeview you want to translate and enable inline translation for it. Then go to the front end, select text and translate.
2. Download the extension (it will be always the latest extension version)
3. Unpack the downloaded folders
4. Disable the Compilation mode in Magento
5. Upload the overwriting existent files of our extensions to Magento root folder (please note that if you customized the files of our extension, the customizations will be overwritten)
6. Refresh site cache (if it\'s enabled)
7. Re-run the Compilation mode
Reasons to choose NEKLO
We have a qualified support team that is always there to help. We look forward to challenges and approach each of them with an open mind and a nonstandard way of thinking. If there is a problem, we know the solution.
We earned the right to be trusted and proud of the work we have done. We completed many tasks and have a lot to come. We have worked on broad range of domains such as e-Business, Supply Chain Management, Pharmaceuticals, Healthcare, Education, Data Warehousing and more.
We deliver solutions that that we know will work. 40% of our developers are Magento, Oracle and Zend certified. We are enthusiastic about what we do, we are the experts in the field of eCommerce and have a portfolio worth a look.